Seedream 5.0 Pro Prompt Examples: Smarter AI Image Editing
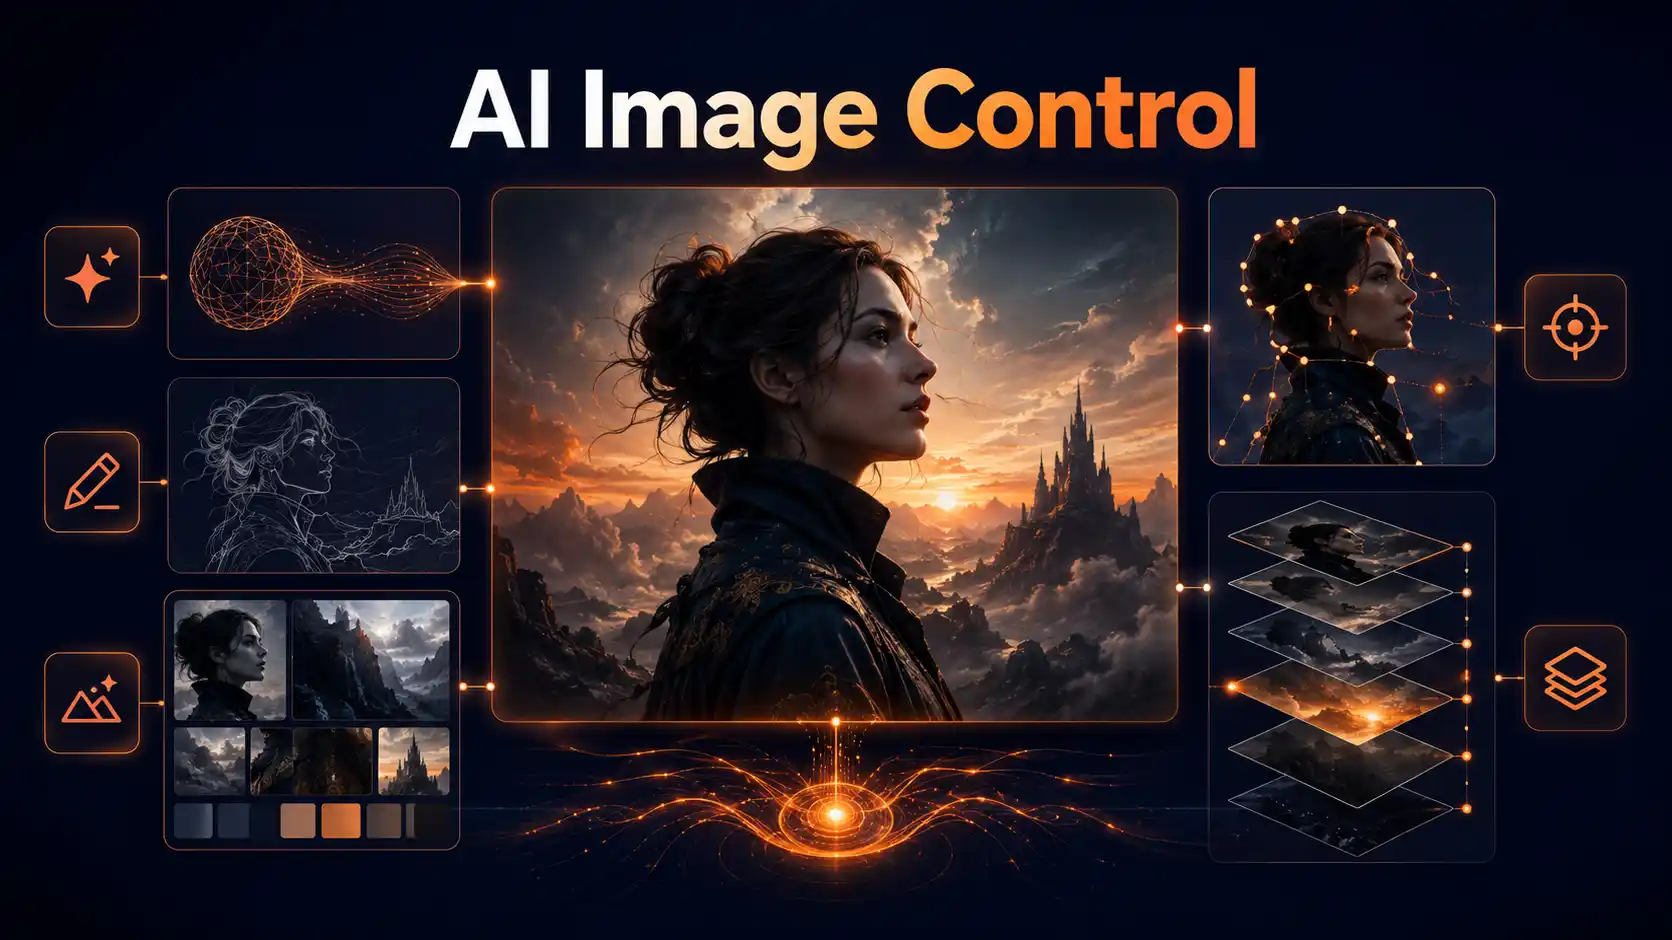
AI image editing often fails because of one small detail. In a traditional AI image workflow, users often have to regenerate the whole image and hope the next version keeps the good parts.
Seedream 5.0 Pro makes this process smarter. Instead of starting over, users can mark the exact area, write a clear editing prompt, and fix only what needs to change.
This article focuses on AI image editing prompt examples: how to edit one detail, keep the rest unchanged, and turn a nearly good image into a usable final visual.
Explore More about Seedream 5.0 Pro 📑
What Makes Seedream 5.0 Pro Prompts Different?
A normal AI image prompt usually starts from zero. You describe the subject, scene, style, lighting, and mood, then ask the model to generate a complete image. That works well for early ideas, concept exploration, and quick visual drafts.
But image editing needs a different logic.
When you already have a usable image, the goal is not to generate everything again.
The goal is to change only what is wrong and protect what already works. That is why Seedream 5.0 Pro prompts should be more specific about location, action, and preservation.
Normal Prompt | Seedream 5.0 Pro Prompt |
Create a new image | Modify an existing image |
Describe the whole scene | Target one area |
Add style words | Add preservation rules |
Regenerate if wrong | Fix only the wrong part |
Focus on beauty | Focus on accuracy |
The first prompt asks for a new image. The second prompt gives editing instructions.
How to Use Position-based Editing for More Precise Design?
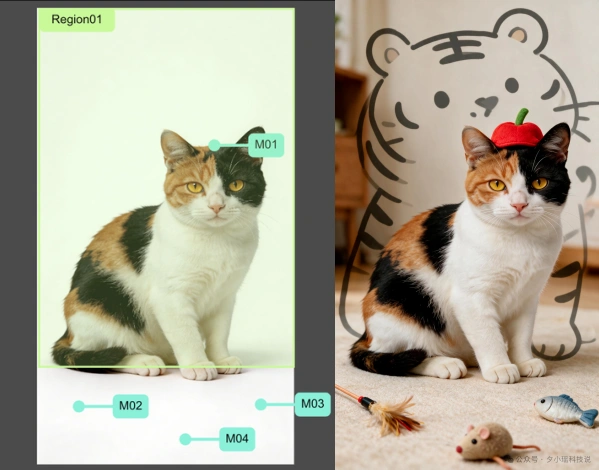
Mark the location first. Edit with control.
Position-based editing is the easiest way to make Seedream 5.0 Pro image edits more accurate. Instead of using vague words like “near the cat” or “behind the subject,” you can mark exact points and regions on the image first.
💡 A simple workflow looks like this:
1. Add a Mark on the target point
Place @Mark01 on the cat’s head.
2. Add Marks for extra objects
Place @Mark02, @Mark03, and @Mark04 on the floor where the toys should appear.
3. Draw a Region behind the subject
Use @Region01 behind the cat for the background element.
4. Write a clear editing prompt
Tell the model what to add, where to add it, and what must stay unchanged.
Prompt example:
Add a small apple-shaped hat on the cat’s head at @Mark01.
Place a low-contrast tiger sketch inside @Region01 behind the cat. Do not cover the cat.
Add a cat teaser at @Mark02, a toy fish at @Mark03, and a toy mouse at @Mark04.
Keep the cat’s fur pattern, pose, body shape, and expression unchanged.
Use a warm home background.
Why it Works:
The prompt gives the model clear coordinates.
The apple hat appears on the cat’s head, the tiger sketch stays softly in the background, and each toy lands in the right place.
✅ Key rule:
Tell the model where to edit before telling it what to change.
How to Use Sketch-Based Editing When Words Are Not Enough?
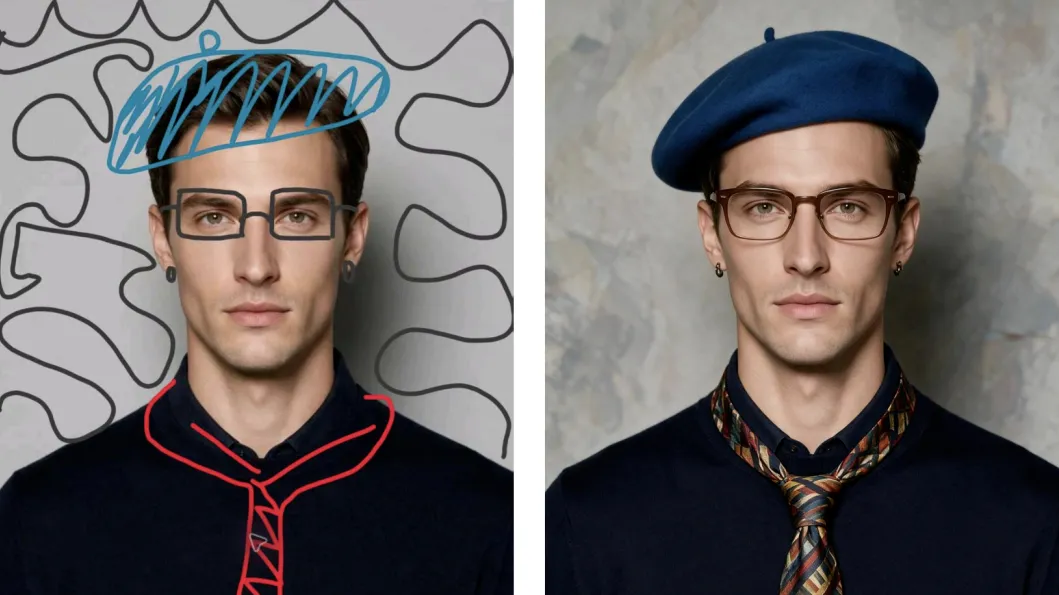
If you cannot explain it, sketch it.
Some image edits are hard to describe with words. The shape may be unusual, the position may be unclear, or the style may depend on a vague feeling.
In this case, sketch-based editing helps users turn rough visual ideas into clear editing instructions.
💡 A simple workflow:
1.Draw rough marks on the image
Add simple lines, boxes, shapes, or color marks where you want changes.
2.Use the sketch as a visual guide
The drawing does not need to be beautiful. It only needs to show the model where and roughly what to create.
3.Write a short editing prompt
Explain what each sketch mark should become.
Prompt example:
Use the sketch marks as a visual guide.
Turn the blue scribble above the head into a blue beret.
Turn the rough boxes over the eyes into brown-framed glasses.
Turn the red mark under the neck into a colorful patterned tie.
Add matching earrings and make the background more artistic.
Keep the person’s face, gaze, skin texture, pose, and identity unchanged.
Why it Works:
Because the sketch gives the model a clearer visual direction.
The blue scribble can become a beret, the rough boxes can become glasses, and the red mark can become a tie.
More importantly, the model can apply these changes while keeping the original facial features stable.
✅ Key rule:
When words are not clear enough, draw the edit directly on the image.
How to Write Color-Code Prompts for More Accurate Images?
Use exact colors, not vague color words.
Color editing is one of the most practical Seedream 5.0 Pro image editing use cases.
In product visuals, saying “make it orange” or “make it more premium” is often not precise enough. A designer may need a specific brand color, while the original material, lighting, shadows, and background must stay unchanged.
A better workflow is to mark the target area first, then use an exact sRGB / HEX color code in the prompt.
💡 The prompt should give the model clear rules:
1.What to change — the upper white plastic shell
2.What color to use — sRGB #FF6B35
3.What to preserve — shape, highlights, shadows, background, and nearby objects
4.What to avoid — no new labels, text, or extra objects
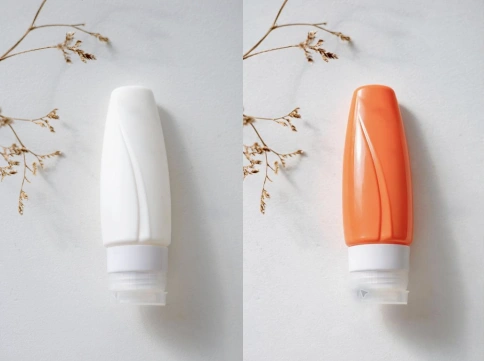
Prompt example:
Change the upper white plastic shell of the bottle to sRGB #FF6B35.
Keep the transparent roller base and the middle white connector ring unchanged.
Preserve the bottle shape, surface highlights, dried flowers, background, and shadows.
Do not add labels, text, or new objects.
For product design, this matters a lot.
The color must be accurate, the selected area should not bleed into other parts, the material cannot become flat, and the original highlights and shadows need to remain natural.
When all of these details stay consistent, AI image editing becomes much closer to a usable design workflow.
✅ Key rule:
Replace vague color descriptions with exact color codes, and always tell the model what must stay unchanged.
How to Use Layer Separation for Design Workflows?
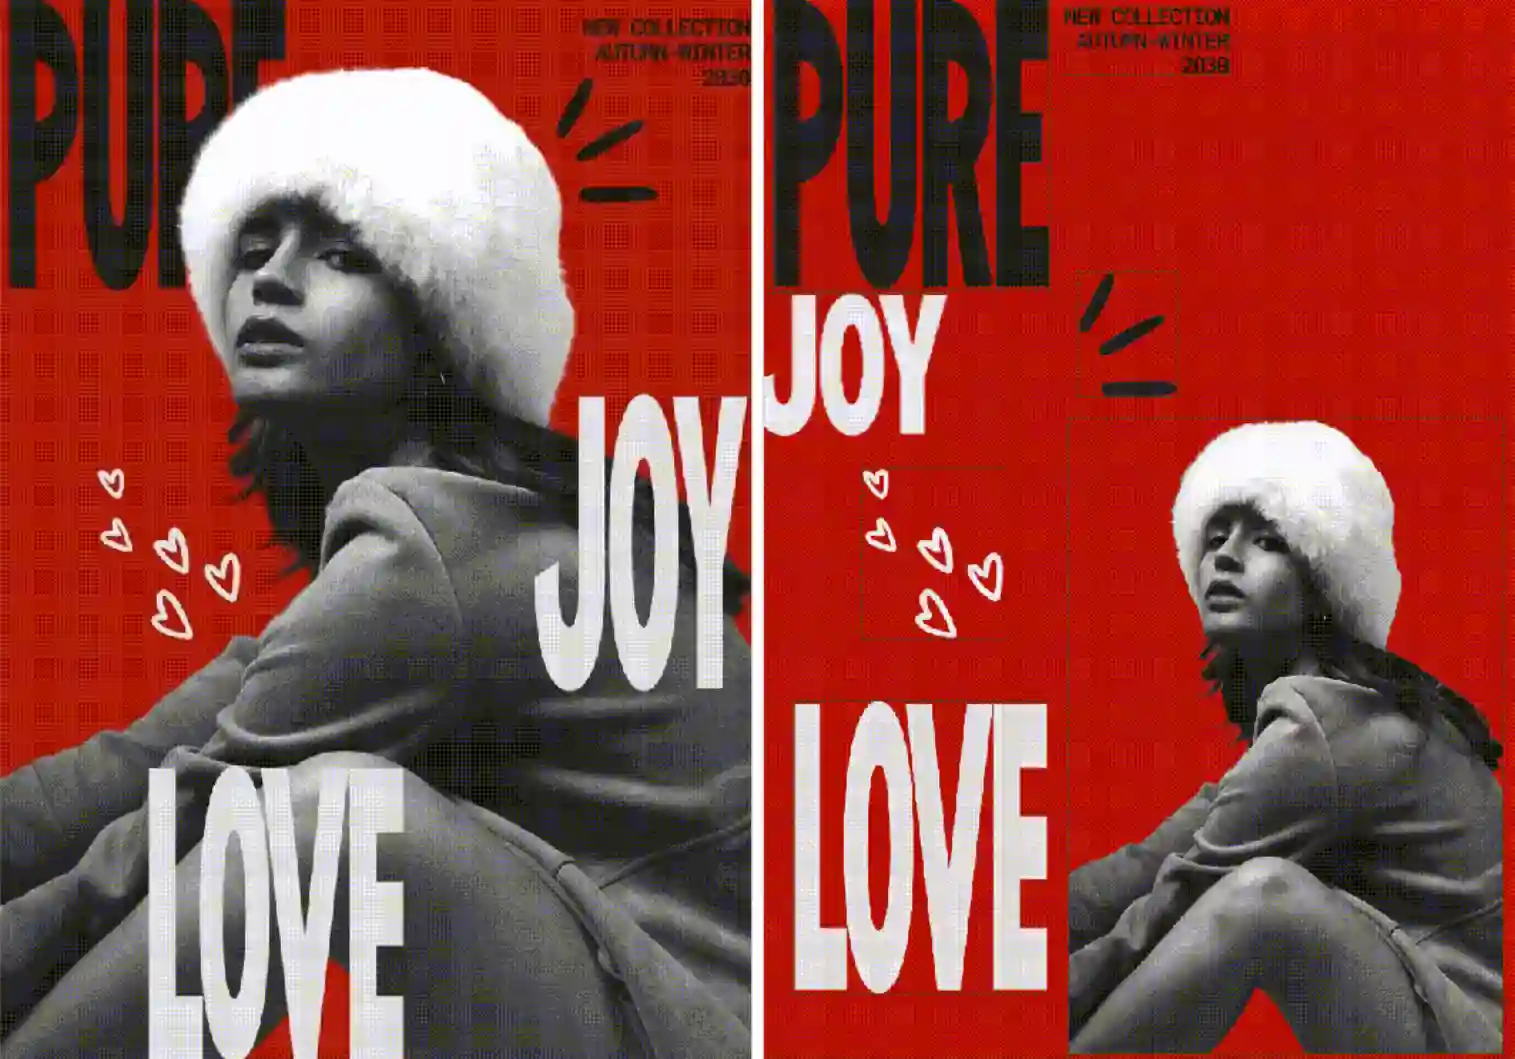
A finished image still be easy to redesign.
Layer separation is useful when an AI-generated image looks good, but still needs further design work.
Seedream 5.0 Pro can separate key elements into editable layers, such as the main subject, text, background, decorations, and other visual objects. In some cases, users can also ask it to cut out a specific object and export it as a transparent PNG layer.
💡 A simple workflow:
1.Generate or upload an image
Start with a poster, product image, character design, or marketing visual.
2.Ask for layer separation
Tell the model which parts should become separate layers.
3.Export editable assets
Use the separated PNG layers in Photoshop, PowerPoint, Canva, Figma, or other design tools.
4.Keep editing without regenerating
Move the subject, resize the text, replace the background, or adjust decorations without rebuilding the whole image.
Prompt example:
Separate this image into editable layers:
main subject, text, background, foreground objects, and decorative elements.
Export clean transparent PNG layers where possible.
Keep the original layout, style, lighting, and alignment unchanged.
✅ Key rule:
Layer separation gives the final image room to keep evolving. This makes AI images more practical for real design workflows.
How to Use Multi-Image Fusion Prompts for Consistent Visual?
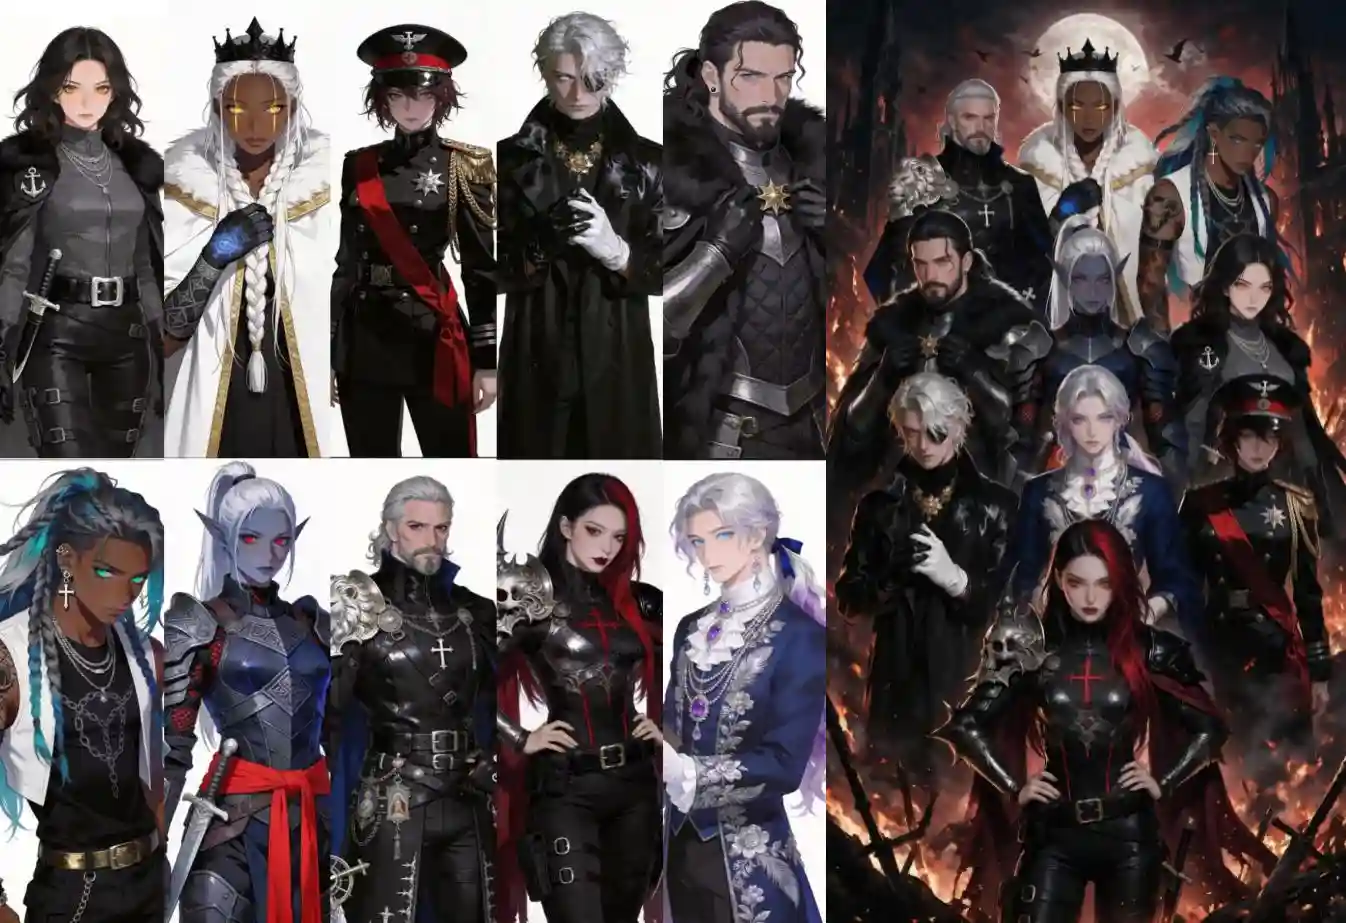
Turn 10 references into one unified world
Seedream 5.0 Pro can work with up to 10 reference images, which makes it useful for group posters, character lineups, product composites, and story-driven visual design.
The key is to define the shared composition, background, lighting, and style rules clearly.
💡 A simple workflow:
1.Upload multiple reference images
Use character, object, product, or style references.
2.Define one shared scene
Tell the model what world all references should belong to.
3.Set one clear composition
For example, a pyramid group layout, a lineup poster, or a multi-panel comic page.
4.Unify the lighting and perspective
Make sure all subjects follow the same light source and visual logic.
5.Add negative constraints
Tell the model what to avoid, such as broken faces, color bleeding, or disconnected backgrounds.
Prompt example:
Use Images 1–10 as character references.
Create an anime-style group battle wallpaper with all 10 characters arranged in a tight pyramid composition.
Set the scene in a burning gothic city battlefield.
Use the fire in the background as the main light source, with warm orange highlights and cool shadows on every character.
Keep each character’s face, outfit, accessories, and key identity details consistent with the reference images.
Avoid flat-color backgrounds, broken composition gaps, mismatched lighting directions, face distortion, and color bleeding between costumes.
The same logic also works for object fusion.
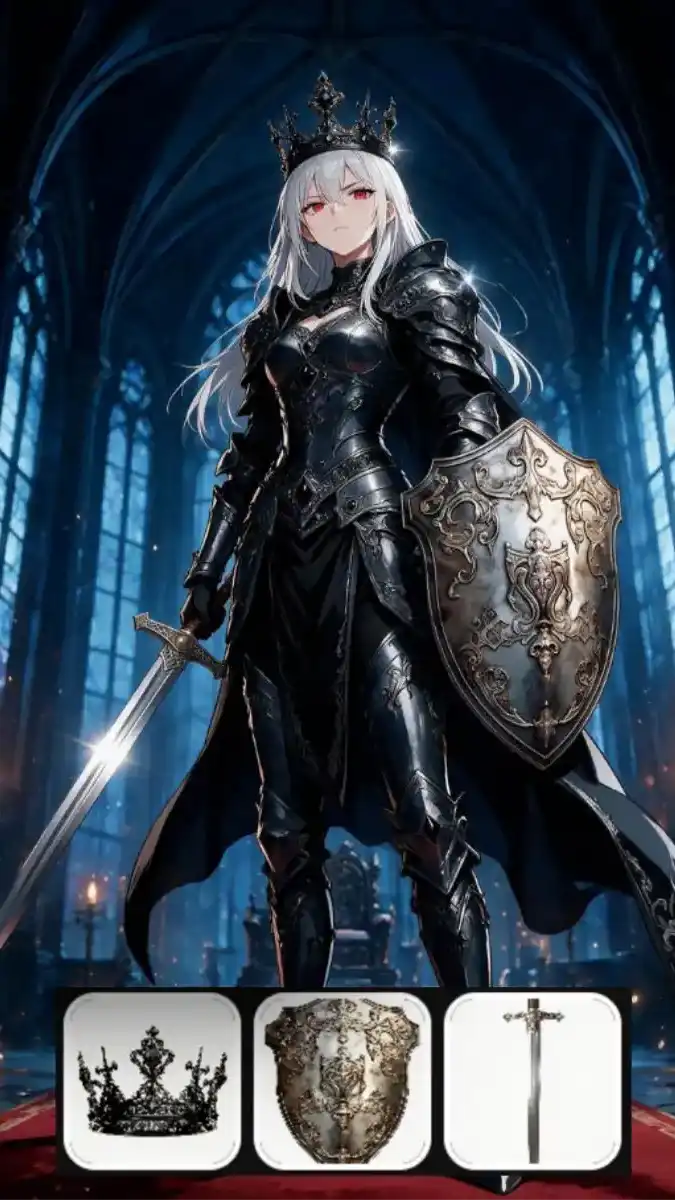
You can combine several item references into one character, such as placing a gothic crown, engraved shield, and sword onto the same female knight while keeping the materials, details, and lighting consistent.
This becomes especially useful for AI comics and visual storytelling.
💡 A practical workflow can look like this:
use reference images to define characters
use a group image to establish the world
split the world into multi-panel story scenes
use local editing to fix props, colors, or outfit details without regenerating the whole page
✅ Key rule:
In multi-image fusion, real success comes from making them belong to the same visual world.
How to Create Clear Infographics from Complex Text?
Information design is understanding, not decoration.
Information compression is one of the most valuable Seedream 5.0 Pro use cases because it turns complex content into a clear visual structure.
💡 A good AI infographic prompt should include:
Main topic: what the visual explains
Core structure: exploded view, timeline, comparison, flowchart, or labeled diagram
Key labels: important parts that must appear
Reading path: how the viewer should understand the image
Text style: clear, readable, and well-organized
For example, a film camera breakdown is not simply a beautiful camera image. The model needs to decide which part becomes the main visual, which components need labels, where arrows should point, and how the viewer should read the information step by step.
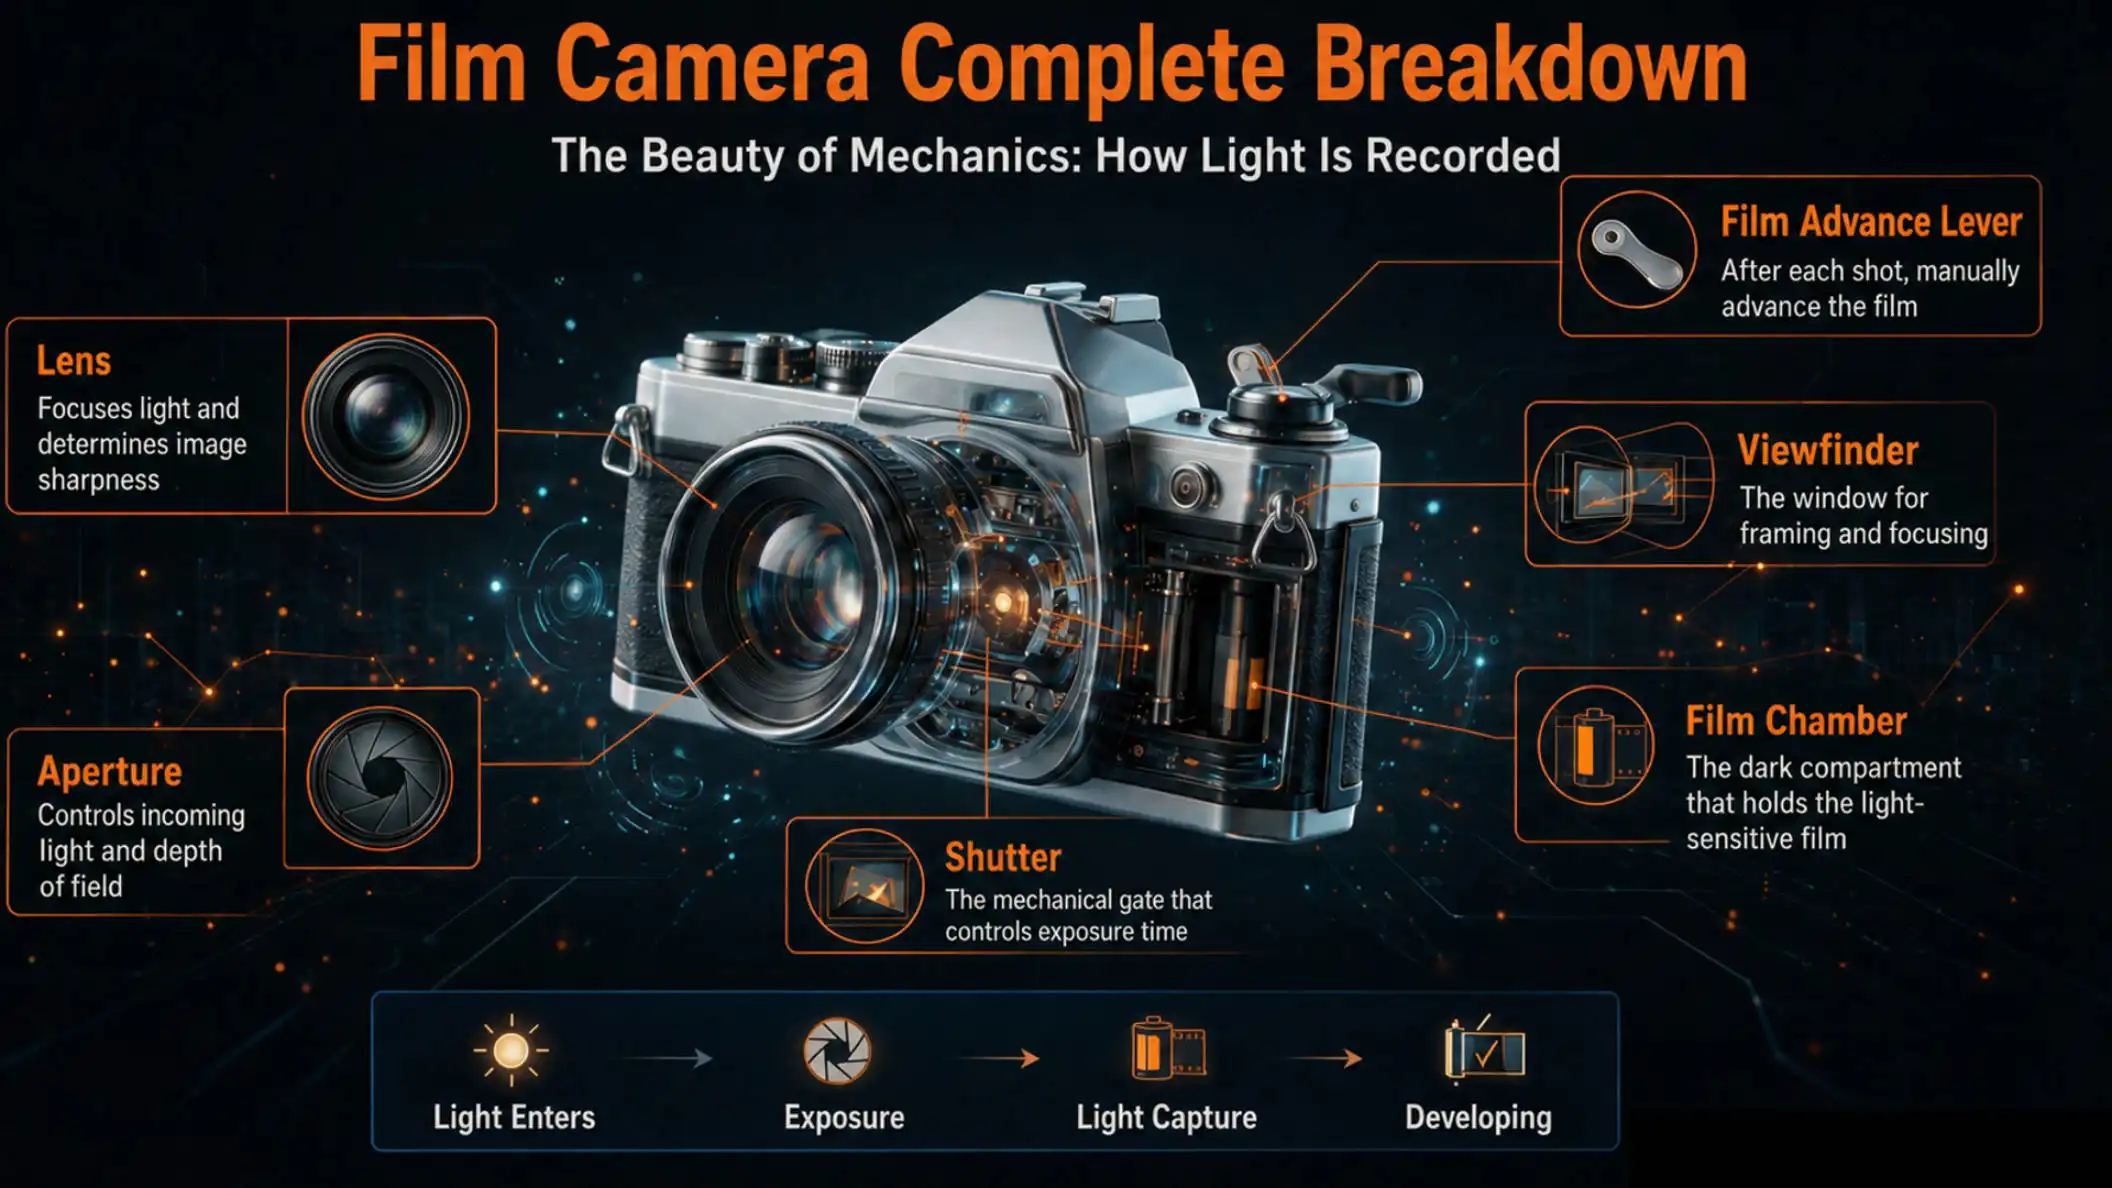
Prompt example:
Create a professional infographic explaining the structure of a film camera.
Use a semi-transparent exploded camera view as the central visual.
Label the lens, aperture, shutter, viewfinder, film chamber, and film advance lever.
Use arrows to connect each label to the correct camera part.
Add a simple bottom workflow showing: light enters, exposure, light capture, developing.
Keep the layout clean, readable, and easy to understand without extra explanation.
💡 The same logic also applies to multilingual design.
When creating different language versions of the same poster, the model should not only translate the words. It should keep the same scene, subject, and visual hierarchy while adjusting text placement for each language.
For example, Japanese and Arabic versions of a “Museum Night” poster may share the same composition, but the text areas need to be reorganized based on character density and reading direction.
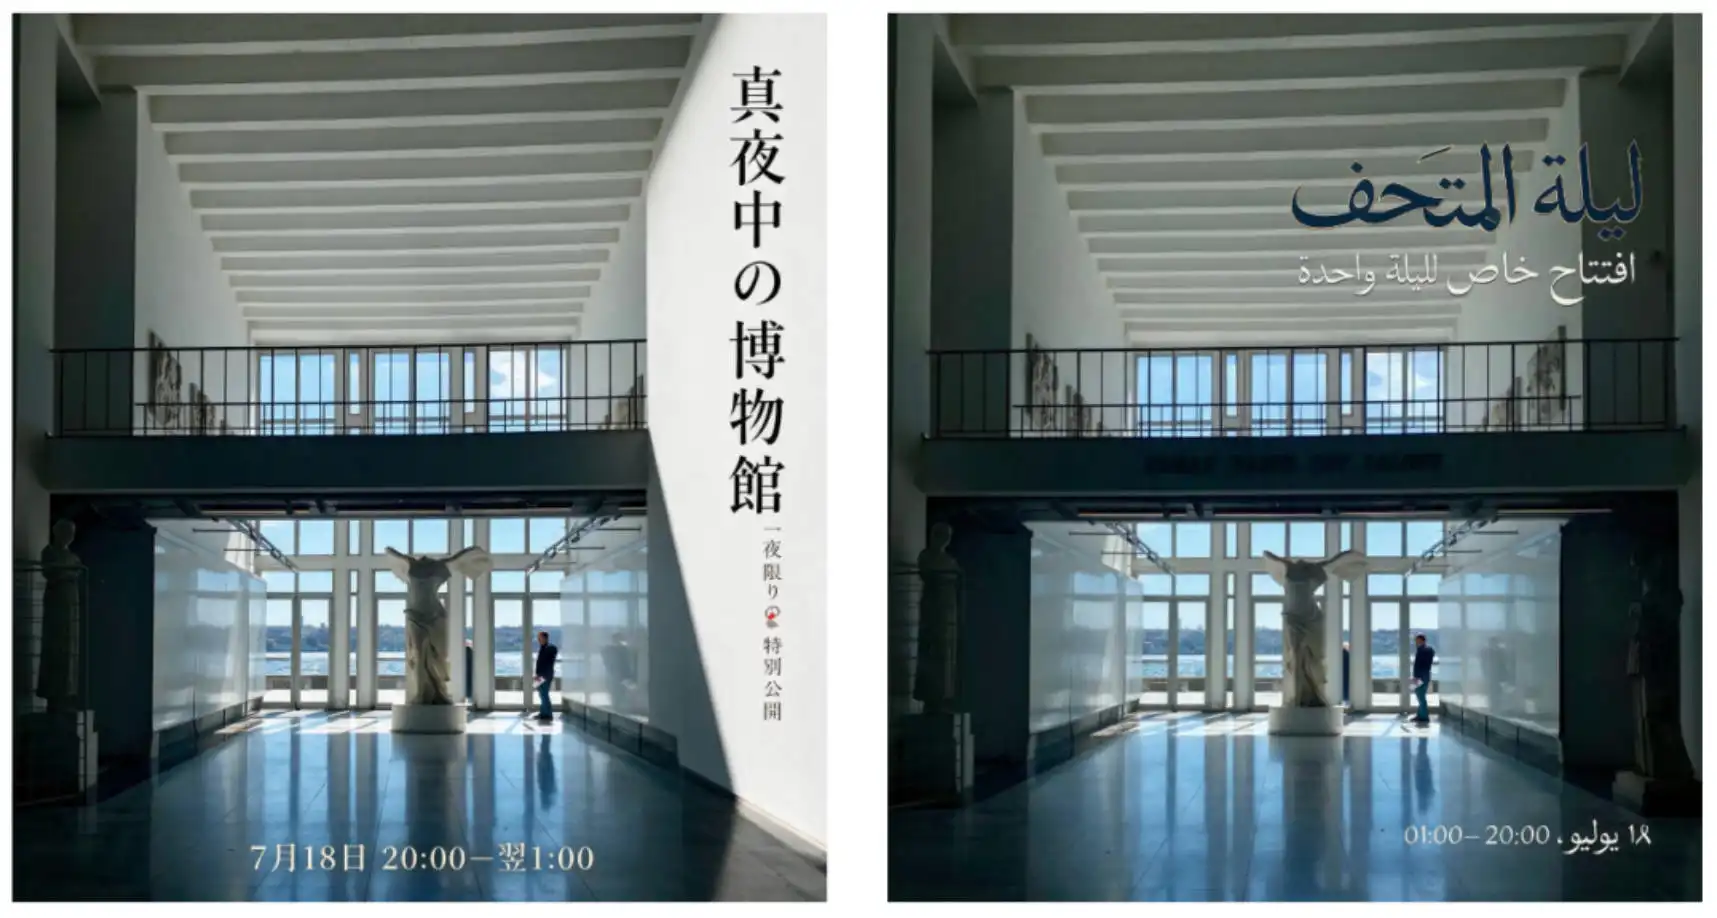
Multilingual poster prompt example:
Create an Arabic version of this poster.
Keep the same scene, main subject, color palette, and visual hierarchy.
Replace the title, date, and opening hours with Arabic text.
Use right-to-left text direction and adjust the text placement to keep the poster balanced and readable.
For brands, e-commerce teams, and content creators, this saves a lot of preparation work. A strong visual system can be reused across languages, markets, and formats instead of being rebuilt from scratch.
✅ Key rule:
Information design is not only layout. It is understanding, hierarchy, and localization.
The Real Upgrade is Revision Control
The future of AI image creation is correction.
For See dream 5.0 Pro image workflow, a strong editing prompt usually needs three parts:
Prompt Part | What It Means | Example |
Where | The exact area to edit | @Region01, @Mark01, selected object |
Change | What should be modified | Change color, remove object, add product, replace material |
Keep | What must stay the same | Lighting, pose, background, texture, layout, identity |
That makes the prompt shorter, clearer, and more useful. Instead of fighting the model with longer descriptions, you give it a precise editing task.
💡 With this workflow, users can:
use marks, regions, and arrows to explain where to edit;
use color codes and material instructions to define what to change;
use sketches to express shapes and positions that words cannot describe;
use up to 10 reference images to unify characters, objects, style, and composition;
use information visualization and multilingual text to connect AI images with marketing, e-commerce, and content production.
🔊 This is important because real creative work is rarely about one perfect generation. More often, users already have an image that is close.
Creator do not want to start over. That is the real shift.
Seedream 5.0 Pro turns everyday design instructions into editable, checkable, and repeatable actions:
Change this color. Keep everything else.
Move this object here. Do not change the background.
Add this one where I marked it.
Fix this label without redesigning the whole image.
Choos Seedream 5.0 Pro AI Image Generator to turn a nearly good result into a polished, production-ready design.
Related Articles
Seedream 5.0 Pro vs GPT Images 2.0: Real Tasks Comparison
Compare Seedream 5.0 Pro and GPT Image 2.0 through real creative tasks, including realistic images, portraits, editing, design, and infographic generation.
How to Use Sketch Prompts in Seedream 5.0 Pro for AI Design
Learn how to use sketch-to-image workflow in Seedream 5.0 Pro to turn rough layouts, poses, scenes, and design ideas into polished AI images.